Seed apps are great.
They can be the test-bed for new devops features, mini onboarding exercises, or just “batteries-included” starter kits for greenfield applications.
Especially in the web application (and Python) world, almost everything comes with extra considerations - testing, linting, containerization - wouldn’t it be great if we could make a Python seed that came with all of that baked in?
What a beautiful, productive world that would be (skip straight to the github repo to go there now).
Structure
Let’s start with a simple filesystem layout.
/src
/tests
Conventional wisdom for Python projects is to use Jean-Paul Calderon’s excellent advice in “Filesystem of a Python Project”.
This is great, but Jean-Paul’s advice is aimed primarily at Python Package creates / maintainers. We’re envisioning this as a seed for a simple Python web app or script, which means we’d prefer things like using src as our source code directory (as opposed to something project-specific).
Keep in mind too that Calderone’s article was written in 2007, when Docker (2010) was just a blink in Solomon Hyke’s eye. Using the src pattern gives us a clear, semantic way of bundling our code to be copied over as part of the Dockerization process. And since we’re going to be writing this app in Python 3.X, we don’t have to worry about keeping empty, placeholder __init__.py files.
The advice generally ages well though. If you find yourself needing a collection of scripts or executables, for example, adding a scripts or bin directory will give you an easy-to-understand location that other devs jumping onto the project (or you in a year) will grok instantly.
Let’s also add an app.py under /src as some sample Python application code to test. We’ll keep it to a classic:
print("Hello World!")
Housekeeping
Though we’ve settled on a basic directory structure there are still some essential files we should add, like a README.md and setup.py.
We’ll need the setup.py file for our test runner, tox. We can create a really basic one with just a few lines:
from distutils.core import setup

setup(
    name='Seed Project',
    version='0.1',
    packages=['src',],
)
Of course the project’s name should be changed to reflect the application you’re building, but a placeholder works fine too.
Let’s also add a .gitignore so we can exclude things from versioning - like cached testing info - we don’t particularly care about project-to-project.
Here’s what the root project directory looks like now.
/src
/tests
.gitignore
setup.py
README.md
Dependency Management
What dependencies could an empty project have? We haven’t written any application code - what sort of dependencies do we need to account for?
Nothing yet. But we can still structure our dependency files for the eventuality that, you know, we’ll put something in this someday.
Let’s update our current repo.
/src
/tests
.gitignore
setup.py
README.md
dev-requirements.txt
requirements.txt
We split our requirements.txt files into two because we can imagine different use cases for different environments - our Dockerfile / Dockerized version of the app, for example, won’t need any of our testing code, just the raw production application. By keeping our testing dependencies out of what will be the production image, we can make deploying it that much faster.
I prefer using the dev-requirements.txt and requirements.txt naming convention, as opposed to having a requirements directory or some other nested structure, so I can keep things flat and Pythonic.
Linting
If it’s not already a part of your development process, baking linting into everything you do can be a powerful resource and teaching tool. Incorporating linting into your own red-green-refactor cycle can nudge you towards adopting style patterns that are less bug-prone, easier to read, and faster, without the apocalyptic potential of a massive global refactor. Lint as you develop instead of after you develop, so you can anticipate and course-correct idiosyncratic style decisions - linting, like testing, is best adopted at the beginning of a project, instead of grafted on to the finished product.
We’re going to use pylint as our Python linting solution. I’ve chosen pylint because it’s easy to use, employs a simple configuration system, and has granular message control for suppressing unwanted rules.
Let’s update our dev-requirements.txt to include our new dependency pylint==2.1.1 and install it with pip install -r dev-requirements.txt.
With pylint installed, we can generate a pylintrc configuration file with a simple command.
pylint --generate-rcfile > .pylintrc
And this will create a .pylintrc file you can edit. pylint provides you the option of reading from a user-level instead of a project-level configuration (e.g. ~/.pylintrc) but it’s best to keep the linting configuration file in the project - even if it weren’t strictly necessary for CI/CD integration.
Here’s an updated look at our project root.
/src
/tests
.gitignore
setup.py
README.md
dev-requirements.txt
requirements.txt
Testing
For testing we’re going to use pytest (you could also use nose here or whatever framework you’re most comfortable with) as our testing library and tox as our test runner. tox was designed to test a Python app against multiple different Python versions for maximum interoperability, making it a bit overkill for our purposes, but it’s still a great handle for external CI/CD systems to execute our tests (and linting) in the proper virtual context. Let’s add tox==3.2.1 and pytest==3.7.3 to our dev-requirements.txt and do another pip install -r dev-requirements.txt.
Remember that /tests directory we set up forever ago? Let’s go ahead and add a sample “hello world”-type placeholder for pytest . Create a test_example.py file inside of /tests and add this code:
def test_example():
    assert True
Pretty simple - we want an always-true test case for evaluating our setup, and this gives us just that.
Now for setting up tox, we just need to create a tox.ini file. Here’s what ours will look like:
[tox]
minversion = 2.0
envlist = py36
skipsdist = True

[testenv]
commands = {envbindir}/pytest {posargs}
deps = -r{toxinidir}/requirements.txt
       -r{toxinidir}/dev-requirements.txt
recreate = False
passenv = *

[testenv:lint]
basepython=python3.6
deps = -r{toxinidir}/requirements.txt
       -r{toxinidir}/dev-requirements.txt
commands=pylint src
Going through the tox documentation, our choices should be pretty clear. We’re selecting just the py36 environment because we’re only interested in running tests against the Python version we’re actually using. We have the [testenv] section, which lays out the actual commands for executing a test (installing all of our requirements, running the pytest command), and the [testenv:lint] section, which allows us to kick off our linting regimen via tox -e lint. Using pylint this way allows us to return an error code to CI/CD systems when we have style mistakes.
You also might notice that our tox.ini file uses the pylint src command to make sure that we’re only linting our application code and not our configuration or setup files.
Containerization
The final piece of our puzzle is integrating this setup with Docker, to make it portable. Docker is of course excellent for devops and setting up structured, deterministic deploy pipelines. But even as a simple dependency management system similar to virtualenv, Docker can be a great solution (if a little overkill). There’s a certain joy to working on a project on your own system, collaborating with a colleague who has a different machine, and deploying to a third operating system for the deploy - where everything works every step of the way because of the common Docker foundation.
Let’s look at our Dockerfile and explain some of the choices we’ve made along the way. Add this Dockerfile to your project’s root directory.
FROM python:3.6-alpine

COPY requirements.txt ./

RUN pip install -r requirements.txt

Add /src /app

WORKDIR /app

CMD ["python", "app.py"]
It doesn’t come much simpler: We’re using the alpine version of Python 3.6 to try and keep our base image slim (you can read more about using the alpine versions as base images and their performance benefits on Nick Janetakis’ blog); then copying over our production requirements.txt file and installing our pip dependencies, before we add our src code to the Docker image’s /app directory and declare it our working directory. Docker’s CMD functionality allows us to specify the command we want to run when the image is executed, in this case bootstrapping our app.py.
Validation
Let’s take a look at our final project directory.
/src
/tests
.gitignore
Dockerfile
setup.py
README.md
dev-requirements.txt
requirements.txt
Now to see what this gets us, verifying the CI/CD tools we’ve put into place.
tox -e lint
Running the lint command you might see it spit out a failing exit code like this.
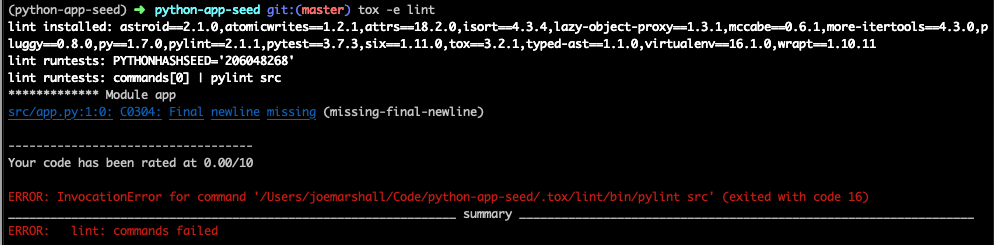
But don’t panic! There’s no error in our implementation - tox is doing exactly what we want it to do in this situation, returning an error for a failing style. If we correct the offending rule by adding a newline to the end of the app.py file and run it again…
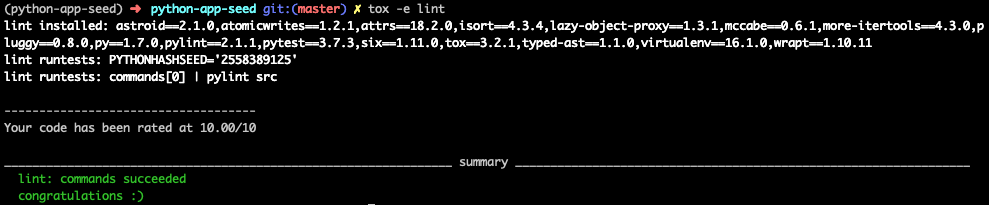
Success! Let’s move on to testing.
tox
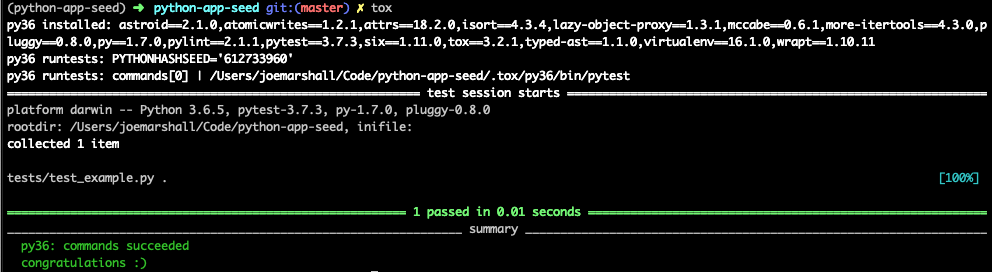
We can see tox build a Python 3.6 environment, installing our dependencies and executing our (one) test - just like it should. Unsurprisingly, our test passes.
In order to test our Dockerfile, let’s build and tag an image. We’re calling ours “seed-app” but in principle you can name your Docker image anything.
docker build -t seed-app .
When that’s been successfully built, we can run the image with the following command:
docker run -it seed-app
We’re using the -t flag just as we did with our build command to make sure we run the image we just tagged as “seed-app”, while the -i (interactive) flag makes sure the Docker image STDOUT gets piped back to our terminal. And what gets piped back to our terminal when we run this image?
Hello world!
Hello Python seed!
Conclusion
Seed apps are useful for the purpose they fulfill - sometimes you just want to spin up a Python applet with all the goodies without gutting an open source app or hand-coding the boilerplate each time.
They can also be useful as a PoC and teaching tool, showing the simplest ways in which different services can be glued together.
Hopefully this post has accomplished some small version of that, and shown how a Python 3.6 app can be easily integrated into a modern, containerized, tooling setup - one that’s ready from the first commit.